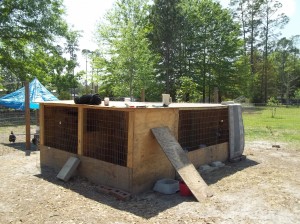
 I wanted to share with you how easy it is to enlarge your chicken house if you make this simple dugout. See, once you get the chicken bug, you will get more chickens and then realize you don’t have enough room for them all. Living in Florida, I don’t really have to worry about the weather so I don’t have to close the houses up. When the weather gets cold and I have smaller chicks/chickens, I run extension cords and use heat lamps.
The main thing you will need to buy is three 4×8 sheets of wood and nine 2x4s. Eight of the 2×4’s will be used to make a frame and the nineth one will be used to run down the center of the roof to keep it from buckling or bending or drooping.
So, to build the first chicken house which is actually on the back side of this picture and you cannot see it, we just built a 4×8 structure with one side totally open. You make a 4 foot tall by 8 foot long structure, similar to a dugout. When we cut the 4×8 sheet of wood into two pieces (for the sides), we laid them on top of each other and put a hole thru both boards so we could run a pole thru each hole for perching and it would be level.
As we got more chickens, we needed more shelter. We then used the back side of the existing chicken house to save money and space in the yard. We added 2×4 boards to the back board and worked out adding the two sides first and making the frame to add the roof. It was all very simple. It saved us the cost of the board (15 bucks). That is the one you see on the right of the picture. We put a board across the bottom because we use this side as a nursery for our small chickens/chicks and we don’t want them to get out. Then I just put welded wire fencing across the front to keep them in. The fencing is easy to mold to the structure so I only tacked one side down and bent the other around the outside of the structure for easy access.
Then I had two chickens go broody and I wanted to separate them from the other chickens. The other chickens kept laying eggs in the same nest as the broody hens. You can just mark the eggs with an X showing what eggs you want to leave under the momma hen and then take the rest out daily. I don’t like doing this because the momma gets so mad when you disturb her. After she has enough eggs under her, I move her and her eggs. She gets mad and gets off the eggs for a little while but eventually settles back down on the eggs.
We needed a place for the broody hens so we decided to enlarge the houses by adding on to the side of the two chicken houses already built. The two chicken houses were 8×8 and we added the chicken house on the end which now made the chicken houses 12ft x 8 ft. Again saving us 15 bucks. Again, put a board across the front bottom to keep the baby chicks inside the 4×4 dugout. The welded fence across the front is not attached at all. The concrete block in the center is holding the fence to the structure and I just bent the fence around the corners of the outside of the structure.
Also, when I made this 4×8 into two 4×4 section, I put the center wall only half way up. It is a temporary wall that I can remove and make into the space a 4×8 again.
I am raising Silkie chickens and will be separating them by color when I intend to incubate the eggs and get pure white, black, light blue, dark blue, splash, and grey chicks. I really enjoy it when the hens do the sitting instead of incubating. I like to see the momma hens with their babies running around. These 4×8 dugouts will be ideal for putting a couple hens and rooster together for mating purposes. The article I read said you should keep a rooster and hen together for at least 3 or 4 weeks in order to ensure that you get eggs fertilized by the rooster you have chosen.